
IMU Joystick
This example illustrates how users can write an game application on the Unity Engine to make a Gyroscope based Ziro robot. This is to be followed by setting up the Unity Enviornment. By tilting forward / backward or left/ right the robot will maneuver in those directions. The script can be downloaded from this link
This application is based on a Trike or a Rover robot. The application will allow the user to move the Ziro robot using the IMU from the phone and maneuver it based on the tilts of the phone.

We will explain the various elements of the IMU script. We first include all the necessary system settings for Unity engine to start. We also initiate the public and private variables that will handle the data from the sensors and will be used to prepare the message packets.
      using System.Collections;
      using System.Collections.Generic;
      using UnityEngine;

      public class IMU : MonoBehaviour
      {
        public float speed = 5f;

          public float multipler = 2;

          private int m_T = 0;

          private string s_T = "";
          private string s_M = "";
We can leave the start as it is as we will use Update() to update our frames.
          // Start is called before the first frame update
          void Start()
          {

          }

          public void SliderChange (float newValue)
          {
              multipler = (newValue/20);
          }
The Update() will capture the input acceleration values from the phone device using the Input.acceleration.x and Input.acceleration.y, store them in temporary variables Xtemp and Ytemp.
We have multipliers and filters that take care of the values to be passed on to be sent to the Ziro motors. We also have attached this script to our main game object.
For a visual feedback, we use transform.Translate to the game object for the GUI of the app.
          // Update is called once per frame
          void Update()
          {
              float Xtemp = Input.acceleration.x;
              float Ytemp = Input.acceleration.y;

              float xVector = multipler*Xtemp*100;
              float yVector = multipler*Ytemp*100;

              transform.Translate(-speed*Xtemp * Time.deltaTime,0,0);
              transform.Translate(-speed*Ytemp * Time.deltaTime,0,0);
We then initiate our s_T and s_M values for the target and mode respectively.
Based on the acceleration X and acceleration Y values we create conditions that modifies our pType for our robot to move forward, backward, left or right.
The threshold values presently are at 50 as we wanted to provide the user with buffer spaces so as to the robot does not move in the intial movements of the robot.
    Mode = [2,1,0,0,0,0,0] -> Forward
    Mode = [1,2,0,0,0,0,0] -> Backward
    Mode = [1,1,0,0,0,0,0] -> Left
    Mode = [2,2,0,0,0,0,0] -> Right
              s_T = "";
              s_M = "";

              if (Mathf.Abs(xVector)<50) {
                  m_T = 0;
                  s_M = "[0,0,0,0,0,0,0]";
              }

              else if (xVector < 50)
              {
                  m_T = 60;
                  s_M = "[2,1,0,0,0,0,0]";
              }

              else
              {
                  m_T = 60;
                  s_M = "[1,2,0,0,0,0,0]";
              }
We then condense all the modes and target and prepare the pType to be sent via the UDP protocol. We use a for loop to capture all the 6 values to form the mode array of our pType.
Pay attention that gameObject.GetComponent uses the UDPClient.cs attached to the game object and broadcasts the value using the UDP protocol
              s_T += m_T.ToString();
              for (int ii = 0; ii < 6; ii++) {
                  s_T += ",";
                  s_T += m_T.ToString();
              }

              string mssg = "{\"pType\":7,\"m_T\":[" + s_T + "],\"m_M\":" + s_M + "}";
              gameObject.GetComponent ().SendValue (mssg);
          }
      }
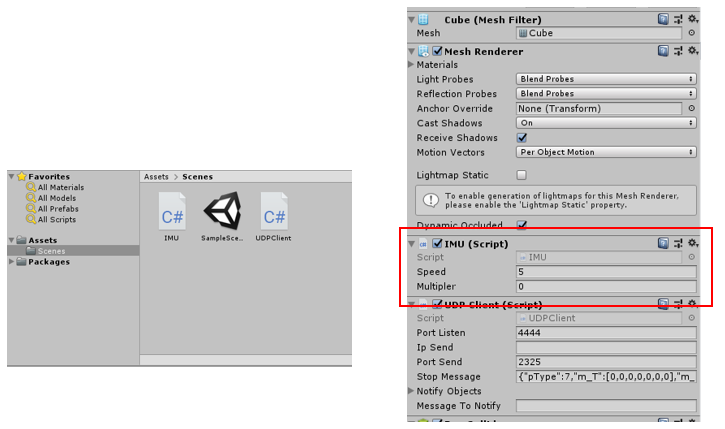
This is an application code that is attached to the game object in the Unity scene, same as we attached the UDPClient.cs to the game object. Drag and drop the IMU.cs to the scene folder of the Asset file. Then select the game object and drag and drop the IMU script in the Inspector of the game object. You should see the UDPClient from our setting up the Unity Environment
Once the Unity game script is created, we would burn the code onto the phone and launch the app.
The resources that are needed to burn publish the app on the phone can be found in the link here - iOS and Andriod.
We encourage the readers to build on top of this code's logic to associate y vector for the robot to turn using the yVector.