Basic Autonomous Robot with Arduino - Sensor Fusion
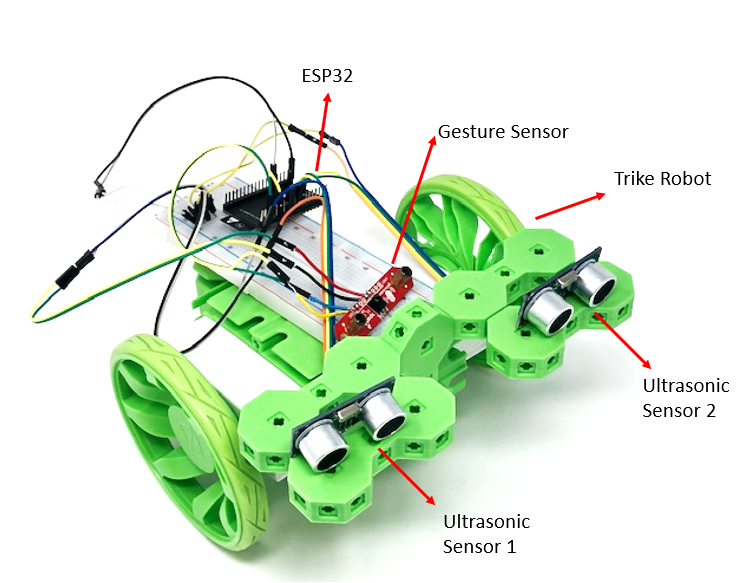
In this example we further explore Arduino capabilities with Ziro. At the end of this example we would make a Ziro rover that can be controlled using ultrasonic sensors and gesture sensors (to start and stop the robot).
Ultrasonic sensors are popular sensors that are used to bring simple intelligence to the robot, that helps avoid walls and structure. A simple gesture sensor captures gross movements of the hand which becomes the global gestures for starting/stopping the robot.
The hardware required for this examples are as follows -
- ESP32 Microcontroller
- Ultrasonic Sensors
- ZX Gesture Sensors
- Battery / Battery Bank
- Micro USB cable
- Ziro Trike Robot
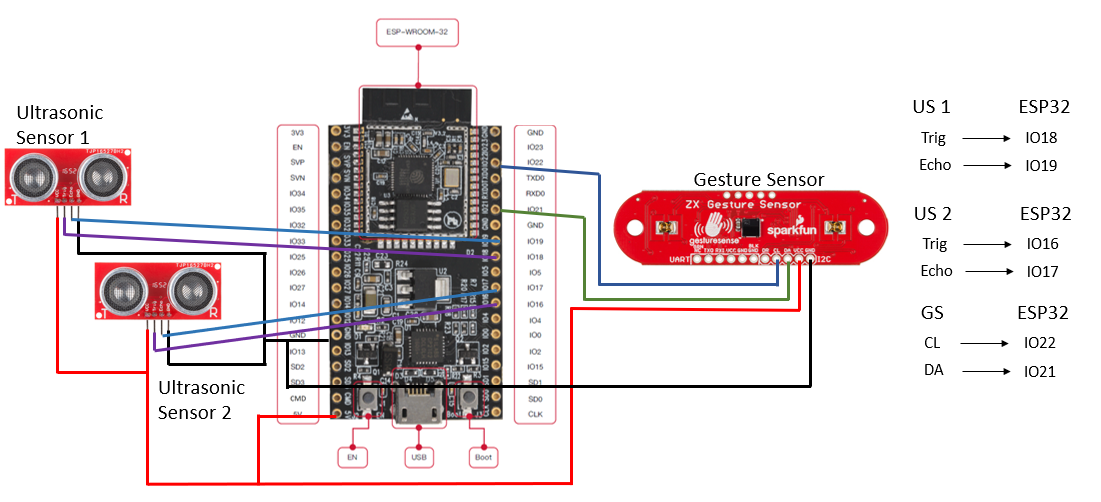
The hardware connection for the two needs to follow the following layout-
Please download the latest Arduino IDE and set it up for the ESP32 board.
As discussed below, we include the necessary libraries to enable Wifi communication with the Ziro robots. We also declare the Wifi credentials for this particular ESP32 to connect to our Ziro modules. Module-xxx-00 is the parent module
to which we would connect the ESP32 to. Here xxx represents the KitId of the Kit, so please fill in the appropriate number there. The password for the Wifi connection is "zirokits".
#include "AsyncUDP.h"
#include "WiFi.h"
#include
#include


const char * ssid = "Module-325-00";  /// MODULE TERMS
const char * password = "zirokits";
After declaring pinouts and some global variables, we define our setup(). This function starts the serial monitor for debugging - Serial.begin(19200); , tries to connect to the declared SSID about ten times - WiFi.begin(ssid, password);
and prints a set of data when a successful connection has been made. Please note that this connection is a simple wifi connection to the parent motor module on port 2325.
bool WifiConnected;
AsyncUDP udp;
int cntr = 0;
int trigPin = 18;    // Trigger
int echoPin = 19;    // Echo
int trigPin2 = 17;    // Trigger
int echoPin2 = 16;    // Echo
double duration, inches;
boolean wall = false;
double duration2, inches2;
boolean wall2 = false;
const int ZX_ADDR = 0x10;    // ZX Sensor I2C address
uint8_t x_pos;
uint8_t x[3];
int difference[2];
ZX_Sensor zx_sensor = ZX_Sensor(ZX_ADDR);
int gesture = 1;
int temp_gesture = 0;
const int NONE = 0, START = 1, STOP = 2;

void setup() {
  uint8_t ver = 0;

  //Serial Port begin
  Serial.begin (19200);

  // Initialize ZX Sensor (configure I2C and read model ID)
  if ( zx_sensor.init() ) {
    Serial.println("ZX Sensor initialization complete");
  } else {
    Serial.println("Something went wrong during ZX Sensor init!");
  }

  // Read the model version number and ensure the library will work
  ver = zx_sensor.getModelVersion();
  if ( ver == ZX_ERROR ) {
    Serial.println("Error reading model version number");
  } else {
    Serial.print("Model version: ");
    Serial.println(ver);
  }
  if ( ver != ZX_MODEL_VER ) {
    Serial.print("Model version needs to be ");
    Serial.print(ZX_MODEL_VER);
    Serial.print(" to work with this library. Stopping.");
    Serial.print(ver);
  }

  // Read the register map version and ensure the library will work
  ver = zx_sensor.getRegMapVersion();
  if ( ver == ZX_ERROR ) {
    Serial.println("Error reading register map version number");
  } else {
    Serial.print("Register Map Version: ");
    Serial.println(ver);
  }
  if ( ver != ZX_REG_MAP_VER ) {
    Serial.print("Register map version needs to be ");
    Serial.print(ZX_REG_MAP_VER);
    Serial.print(" to work with this library. Stopping.");
  }

  //Try to connect to the Wifi 10 times
  while (WifiConnected == false && cntr < 10) {
    WiFi.mode(WIFI_STA);
    WiFi.begin(ssid, password);
    if (WiFi.waitForConnectResult() != WL_CONNECTED) {
      WifiConnected = false;
      Serial.println("WiFi Failed");
    }
    cntr++;
  }
  if (udp.listen(2325)) {
    Serial.print("UDP Listening on IP: ");
    WifiConnected = true;
    Serial.println(WiFi.localIP());
    udp.onPacket([](AsyncUDPPacket packet) {
      Serial.print("UDP Packet Type: ");
      Serial.print(packet.isBroadcast() ? "Broadcast" : packet.isMulticast() ? "Multicast" : "Unicast");
      Serial.print(", From: ");
      Serial.print(packet.remoteIP());
      Serial.print(":");
      Serial.print(packet.remotePort());
      Serial.print(", To: ");
      Serial.print(packet.localIP());
      Serial.print(":");
      Serial.print(packet.localPort());
      Serial.print(", Length: ");
      Serial.print(packet.length());
      Serial.print(", Data: ");
      Serial.write(packet.data(), packet.length());
      Serial.println();
      //reply to the client
      packet.printf("Got %u bytes of data", packet.length());
      pinMode(trigPin, OUTPUT);
      pinMode(echoPin, INPUT);
      pinMode(trigPin2, OUTPUT);
      pinMode(echoPin2, INPUT);
    });
  }
}
In our loop function, we check Wifi and initiate the UltraSonicLoop() and GestureLoop() loop which deals with the operations of handling the information from sensor and translating them to motor commands. After we get the information from the sensor
, we evaluate where the wall and structure etc are. Based on the output of these functions, we call in movement functions for the robot - Forward() or Turn().
  void loop() {
    GestureLoop();
    if (gesture == START) {
      UltraSonicLoop();
      if (!(wall || wall2)) {
        Forward();
      } else {
        Turn();
      }
    } else {
      udp.broadcast("{""pType"":7,""m_T"":[0,0,0,0,0,0,0],""m_M"":[0,0,0,0,0,0,0]}");
    }
    delay(50);
  }
The UltraSonicLoop() detects for "wall" using the variable inches and inches2. The flag for wall detection is then raised which is called in the void loop().
As shows in the main loop functions are called based on where the robot needs to move.
void UltraSonicLoop() {
  //Send a low pulse before the high pulse to cancel the majority of the white noise
  digitalWrite(trigPin, LOW);
  delayMicroseconds(5);
  digitalWrite(trigPin, HIGH);
  delayMicroseconds(10);
  digitalWrite(trigPin, LOW);

  //Read the input from the high pulse only to avoid unnecessary noise
  duration = pulseIn(echoPin, HIGH);

  digitalWrite(trigPin2, LOW);
  delayMicroseconds(5);
  digitalWrite(trigPin2, HIGH);
  delayMicroseconds(10);
  digitalWrite(trigPin2, LOW);

  duration2 = pulseIn(echoPin2, HIGH);

  //Conversion from time to inches based off the speed of sound in air
  inches = (duration / 2) * 0.01351417;
  inches2 = (duration2 / 2) * 0.01351417;

  //Check for a wall less than 7 inches away
  (inches <= 7 /*&& inches != 0*/) ? wall = true : wall = false;
  (inches2 <= 7 /*&& inches2 != 0*/) ? wall2 = true : wall2 = false;
}
The GestureLoop() captures when the position of the hand moves from left to right or vice versa. We use this instance to start or stop the robot. In the loop(), we instantiate the robot's movements
based on the output flag gesture.
  void GestureLoop() {
  if ( zx_sensor.gestureAvailable() ) {
    temp_gesture = zx_sensor.readGesture();
    if (temp_gesture == RIGHT_SWIPE) {
      //Sensor positioned so a forward swipe will start it
      gesture = START;
      temp_gesture = 0;
    } else if (temp_gesture == LEFT_SWIPE) {
      //Sensor positioned so a backward swipe will stop it
      gesture = STOP;
      temp_gesture = 0;
    }
  }
}
We further write the Forward() and the Turn() to prepare the packets that would be sent to the robot to move around. The Turn() also incorporates the flag which is raised when the wall is
detected.
void Forward() {
  udp.broadcast("{""pType"":7,""m_T"":[55,55,0,0,0,0,0],""m_M"":[2,1,0,0,0,0,0]}");
}

void Turn() {
  if (wall && wall2) {
    //if there is a wall  on both sides go backwards
    udp.broadcast("{""pType"":7,""m_T"":[55,55,0,0,0,0,0],""m_M"":[2,1,0,0,0,0,0]}");
  } else if (wall) {
    //If there is a wall on the right turn left to avoid it
    udp.broadcast("{""pType"":7,""m_T"":[55,55,0,0,0,0,0],""m_M"":[2,2,0,0,0,0,0]}");
  } else if (wall2) {
    //If there is a wall on the left turn right to avoid it
    udp.broadcast("{""pType"":7,""m_T"":[55,55,0,0,0,0,0],""m_M"":[1,1,0,0,0,0,0]}");
  }
}
The sensor powered trike would function as follows. The gif on the left is the gesture activation and one on the right is the wall(obstacle) avoidance -